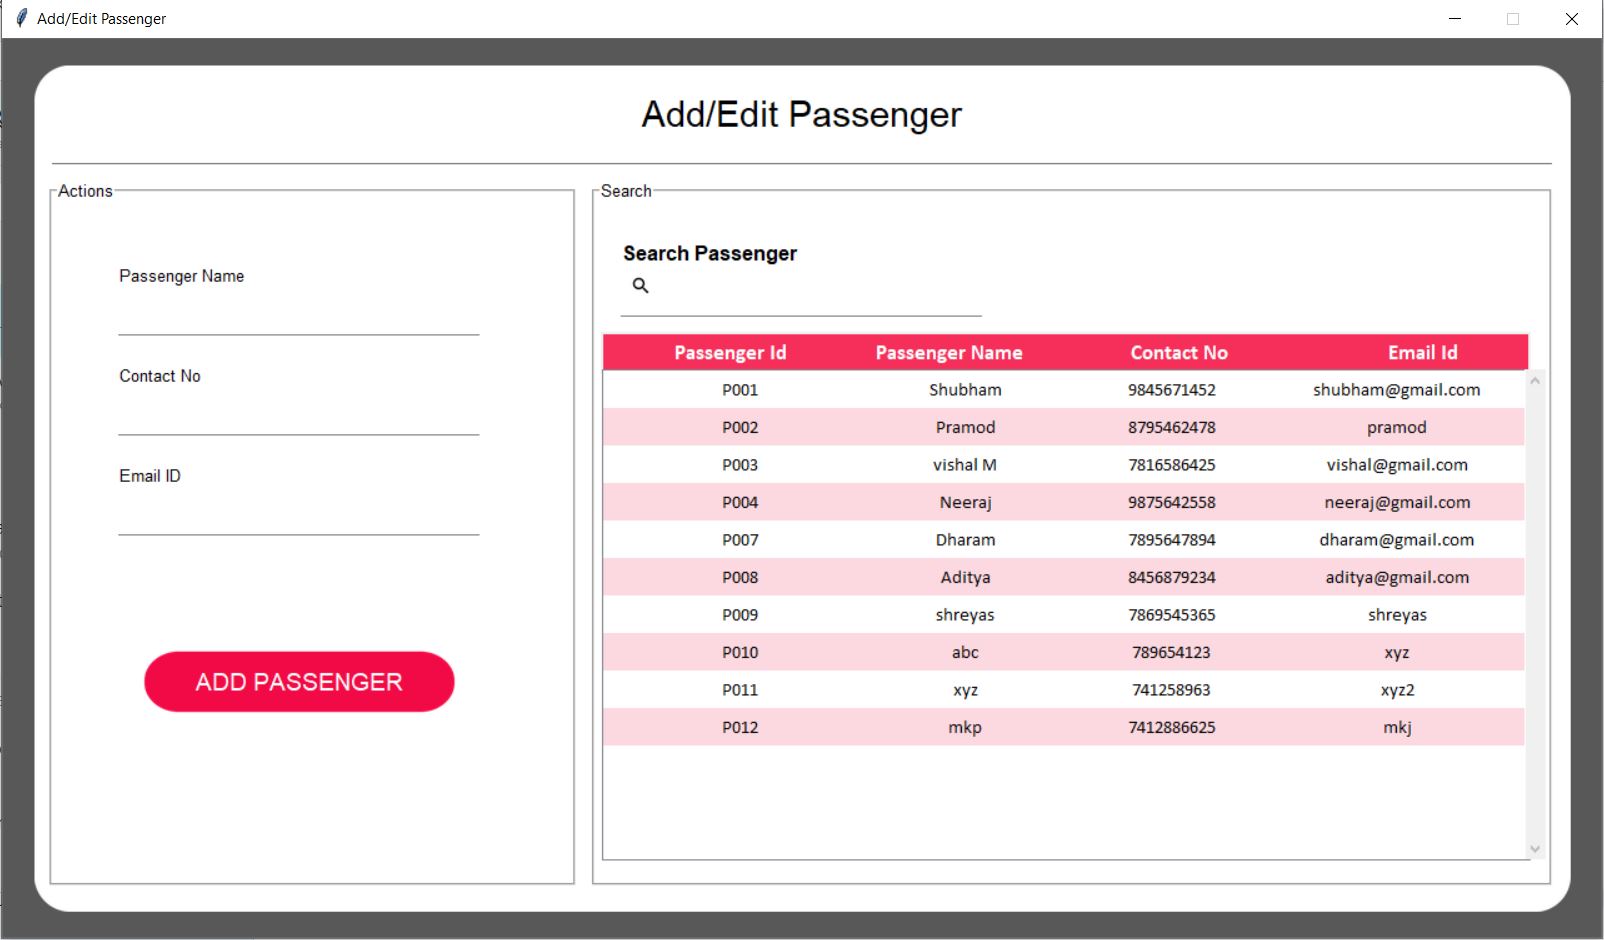
Add/Edit Passenger
    root = tk.Toplevel()
    # root = tk.Tk()
    root.title("Add/Edit Passenger")

    root.configure(bg="#585858")
    root.resizable(width=0, height=0)
    win_width = 1280
    print(1280 * 56.25 / 100)
    win_height = int(1280 * 56.25 / 100)
    root.geometry(str(win_width) + "x" + str(win_height))
    Util.center(root)

    # Get screen size
    screen_width = root.winfo_screenwidth()
    screen_height = root.winfo_screenheight()
    Util.set_font_size(screen_width, screen_height, win_width, win_height)

    self.width = win_width * 96 / 100
    self.height = win_height * 94 / 100
    cornerradius = 40
    padding = 0
    self.color = "#FFFFFF"
After creation of window, we will add a canvas background.
    bg_canvas = RoundBackgroundFrame(root, self.width, self.height, padding, cornerradius, self.color, "#585858")
    bg_canvas.place(width=self.width, height=self.height, x=win_width / 2 - self.width / 2,  y=win_height / 2 - self.height / 2)

    class RoundBackgroundFrame(tk.Canvas):

        def __init__(self, parent, width, height, padding, cornerradius, color, bg):
            tk.Canvas.__init__(self, parent, borderwidth=0, relief="flat", highlightthickness=0, bg=bg)

            original = Image.open("images/corner.png")
            resized = original.resize((int(40), int(40)), Image.ANTIALIAS)
            self.image_r_t = ImageTk.PhotoImage(resized)

            original = original.rotate(90, expand=0)
            resized = original.resize((int(40), int(40)), Image.ANTIALIAS)
            self.image_l_t = ImageTk.PhotoImage(resized)

            original = original.rotate(90, expand=0)
            resized = original.resize((int(40), int(40)), Image.ANTIALIAS)
            self.image_l_b = ImageTk.PhotoImage(resized)

            original = original.rotate(90, expand=0)
            resized = original.resize((int(40), int(40)), Image.ANTIALIAS)
            self.image_r_b = ImageTk.PhotoImage(resized)

            self.shape(width, height, padding, cornerradius, color)
            (x0, y0, x1, y1) = self.bbox("all")
            width = (x1 - x0)
            height = (y1 - y0)
            self.configure(width=width, height=height)

        def shape(self, width, height, padding, cornerradius, color):
            self.create_polygon((padding, height - cornerradius - padding, padding, cornerradius + padding,
                        padding + cornerradius, padding, width - padding - cornerradius, padding,
                        width - padding, cornerradius + padding, width - padding,
                        height - cornerradius - padding, width - padding - cornerradius, height - padding,
                        padding + cornerradius, height - padding), fill=color, outline=color)

            self.create_image(width - self.image_r_t.width(), 0, image=self.image_r_t, anchor=NW)
            self.create_image(0, 0, image=self.image_l_t, anchor=NW)
            self.create_image(0, height - self.image_l_b.width(), image=self.image_l_b, anchor=NW)
            self.create_image(width - self.image_r_b.width(), height - self.image_r_b.width(), image=self.image_r_b,anchor=NW)
    self.width = self.width * 98 / 100
    self.height = self.height * 96 / 100
    self.base_frame = Frame(root, width=self.width, height=self.height, bg=self.color)
    bg_canvas.create_window(self.width / 100, self.height * 2 / 100, anchor=NW, window=self.base_frame)


    # Add Heading Name
    add_heading_label(self.base_frame, self.color, AppConstant.FONT_SIZE, self.height, self.width)

    def add_heading_label(base_frame, color, font_size, height, width):
      label_heading = Label(base_frame, text="Add/Edit Passenger", anchor=CENTER, bg=color,font=("Lucida Grande", font_size + 6))
      label_heading.place(width=width * 90 / 100, height=height * 7 / 100, x=width * 5 / 100, y=height * 0.5 / 100)


    # Add line
    add_line_border(self.base_frame, self.color, self.height, self.width)

    def add_line_border(base_frame, color, height, width):
        line_canvas = Canvas(base_frame, bg=color, borderwidth=0, relief="flat", highlightthickness=0)
        line_canvas.place(width=width - 4, height=5, x=2, y=height * 10 / 100)
        line_canvas.create_line(0, 0, width, 0, fill="#787878")


    button_font = add_action_frame(self.base_frame, self.color, self.height, self.width)

    def add_action_frame(base_frame, color, height, width):
        afw = width * 0.35
        afh = height * 0.87
        button_font = ("Lucida Grande", AppConstant.FONT_SIZE - 6)
        label_frame_action = LabelFrame(base_frame, text="Actions", font=button_font, pady=afw * 2 / 100,
                                        padx=afw * 2 / 100, bg=color)
        label_frame_action.place(width=afw, height=afh, x=0, y=height * 0.12)
        return button_font

    add_search_frame(self.base_frame, button_font, self.color, self.height, self.width)

    def add_search_frame(base_frame, button_font, color, height, width):
        sfw = width * 0.638
        sfh = height * 0.87
        label_frame_search = LabelFrame(base_frame, text="Search", font=button_font, pady=sfw * 2 / 100,
                                        padx=sfw * 2 / 100, bg=color)
        label_frame_search.place(width=sfw, height=sfh, x=width * 0.36, y=height * 0.12)
    # Add passenger UI
        self.psg_name = CustomEntrySimple(self.base_frame, 300, 60, ("Lucida Grande", AppConstant.FONT_SIZE - 6),
                                          self.color,
                                          "Passenger Name")
        self.psg_name.place(x=50, y=150)

        self.psg_contact = CustomEntrySimple(self.base_frame, 300, 60, ("Lucida Grande", AppConstant.FONT_SIZE - 6),
                                             self.color,
                                             "Contact No")
        self.psg_contact.place(x=50, y=230)

        self.psg_email = CustomEntrySimple(self.base_frame, 300, 60, ("Lucida Grande", AppConstant.FONT_SIZE - 6),
                                           self.color,
                                           "Email ID")
        self.psg_email.place(x=50, y=310)
Here is our class CustomEntrySimple:
    class CustomEntrySimple(tk.Canvas):

        def __init__(self, parent, width, height, font, color, text):
            tk.Canvas.__init__(self, parent, borderwidth=0, relief="flat", highlightthickness=0, bg=color)

            self.width = width
            self.height = height
            self.color = color

            self.create_text(6, 5, anchor=W, font=font, text=text, fill="#000000")
            self.create_line(5, height - 8, width - 5, height - 8, fill="#808080")

            frame = Frame(parent,width=width * 95 / 100, height=height * 50 / 100)
            self.entry = Entry(frame, bg=color, bd=0, highlightthickness=0, font=font)

            self.entry.place(relwidth=1, relheight=1, x=0, y=0)

            self.create_window(6, height / 2 - (height * 50 / 100) / 2, anchor=NW, window=frame)
            self.update()

            (x0, y0, x1, y1) = self.bbox("all")
            width = (x1 - x0)
            height = (y1 - y0)
            self.configure(width=width, height=height)
Create a "Submit" button and show it.
    self.show_add_passenger_button()
    def show_add_passenger_button(self):
        self.add_button = RoundedButton(self.base_frame, 250, 130 / 2.56, self.color, "images/button3.png","ADD PASSENGER",font=("Lucida Grande", AppConstant.FONT_SIZE - 2),command=self.add_passenger_click)
        self.add_button.place(x=75, y=self.height * 0.70)
        self.ce_passenger_var = CustomEntry(self.base_frame, 300, 65, 10, 2, self.color, "Search Passenger","images/ic_search.png")
        self.ce_passenger_var.place(x=self.width / 2 - 150, y=self.height * 0.20)
        self.ce_passenger_var.entry.bind('', self.search_passenger)
Here's the logic to search data in table
    def search_passenger(self, *arg):
        if self.ce_passenger_var.entry.get() != "":
            self.tree.delete(*self.tree.get_children())
            conn = Util.connect_db()
            cursor = conn.cursor()
            cursor.execute("SELECT * FROM `passenger_detail` WHERE `passenger_name` LIKE ? OR `passenger_id` LIKE ?",
                           ('%' + str(self.ce_passenger_var.entry.get()) + '%',
                            '%' + str(self.ce_passenger_var.entry.get()) + '%'))
            fetch = cursor.fetchall()

            count = 0
            for data in fetch:
                if count % 2 == 0:
                    self.tree.insert('', 'end', values=data, tags=('even',))
                else:
                    self.tree.insert('', 'end', values=data, tags=('odd',))
                count = count + 1

            # for data in fetch:
            #     self.tree.insert('', 'end', values=data)
            cursor.close()
            conn.close()
        else:
            self.reset_book()

        def reset_book(self):
         self.tree.delete(*self.tree.get_children())
         self.update_table_data()
    class Util:

        @staticmethod
        def connect_db():
            db = None
            try:
                db = sql.connect("inventry.db")
                return db
            except sql.Error as error:
                print("Failed to insert data into sqlite table", error)
Fetch data from database and show it in table form with the use of "Treeview" of Tkinter.
    db = Util.connect_db()
        cursor = db.cursor()

        cursor.execute('SELECT * FROM passenger_detail')
        self.sql_output = cursor.fetchall()

        style = ttk.Style()
        #        style.element_create("Custom.Treeheading.border", "from", "default")
        style.layout("Custom.Treeview.Heading", [
            ("Custom.Treeheading.cell", {'sticky': 'nswe'}),
            ("Custom.Treeheading.border", {'sticky': 'nswe', 'children': [
                ("Custom.Treeheading.padding", {'sticky': 'nswe', 'children': [
                    ("Custom.Treeheading.image", {'side': 'right', 'sticky': ''}),
                    ("Custom.Treeheading.text", {'sticky': 'we'})
                ]})
            ]}),
        ])
        #   style.configure("Custom.Treeview.Heading", background="blue", foreground="red", relief="flat")
        style.map("Custom.Treeview.Heading", relief=[('active', 'groove'), ('pressed', 'sunken')])
        style.configure("Custom.Treeview", highlightthickness=0, bd=0, font=('Calibri', 11), rowheight=30)

        self.table_heading()

        self.tree = ttk.Treeview(self.base_frame, height=13, show='tree', style="Custom.Treeview")
        self.tree.tag_configure('odd', background='#fcd9e1', foreground="#000000", )
        self.tree.tag_configure('even', background='#FFFFFF', foreground="#000000", )
        self.tree.place(x=self.width / 2 - 160, y=230)
        self.tree["columns"] = "1", "2", "3", "4"
        self.tree.column("#1", width=180)
        self.tree.column("#2", width=180)
        self.tree.column("#3", width=150)
        self.tree.column("#4", width=230)

        self.tree.column("#0", width=0)

        count = 0
        for data in self.sql_output:
            if count % 2 == 0:
                self.tree.insert('', 'end', values=data, tags=('even',))
            else:
                self.tree.insert('', 'end', values=data, tags=('odd',))
            count = count + 1

        vsb = ttk.Scrollbar(self.base_frame, orient="vertical", command=self.tree.yview)
        vsb.place(x=self.width - 24, y=230, height=392)

        self.tree.configure(yscrollcommand=vsb.set)

        self.tree.column("#1", anchor=tk.CENTER)
        self.tree.column("#2", anchor=tk.CENTER)
        self.tree.column("#3", anchor=tk.CENTER)
        self.tree.column("#4", anchor=tk.CENTER)
        self.tree.heading("#1", text="Passenger Id", anchor=tk.CENTER)
        self.tree.heading("#2", text="Passenger Name")
        self.tree.heading("#3", text="Contact No")
        self.tree.heading("#4", text="Email Id")

        self.tree.bind('<>', self.on_tree_click)

        root.attributes('-alpha', 0.0)
        root.attributes('-alpha', 1.0)
We have created our own heading for table, lets configure it.
    def table_heading(self):

        heading_y = 203
        bg_color = "#f52f59"
        text_color = "#ffffff"

        canvas = Canvas(self.base_frame, width=740, height=30)
        canvas.create_rectangle(0, 0, 790, 30, fill=bg_color)
        canvas.place(x=self.width / 2 - 161, y=heading_y - 3)

        passenger_id_label = Label(self.base_frame, text="Passenger Id",
                                   font=('Calibri', AppConstant.FONT_SIZE - 3, 'bold'), background=bg_color,
                                   foreground=text_color)
        passenger_id_label.place(x=455, y=heading_y, width=180)
        passenger_id_label.configure(anchor="center")

        passenger_name_label = Label(self.base_frame, text="Passenger Name",
                                     font=('Calibri', AppConstant.FONT_SIZE - 3, 'bold'), background=bg_color,
                                     foreground=text_color)
        passenger_name_label.place(x=self.width / 2 + 28, y=heading_y, width=180)
        passenger_name_label.configure(anchor="center")

        passenger_contact_label = Label(self.base_frame, text="Contact No",
                                        font=('Calibri', AppConstant.FONT_SIZE - 3, 'bold'), background=bg_color,
                                        foreground=text_color)
        passenger_contact_label.place(x=self.width / 2 + 227, y=heading_y, width=150)
        passenger_contact_label.configure(anchor="center")

        passenger_email_label = Label(self.base_frame, text="Email Id",
                                      font=('Calibri', AppConstant.FONT_SIZE - 3, 'bold'), background=bg_color,
                                      foreground=text_color)
        passenger_email_label.place(x=self.width / 2 + 415, y=heading_y, width=165)
        passenger_email_label.configure(anchor="center")
UI part is completed, lets move to funtionality. First we need to add click on "Add Product" button.
    def add_passenger_click(self):

        var = ""
        passenger_email = ""
        passenger_name = ""
        passenger_contact = ""
        is_name_entered = False
        is_contact_number_entered = False
        is_email_id_entered = False

        if self.psg_email.entry.get() == "" or self.psg_email.entry.get() == " ":
            var += "Email Should not be empty, "
        else:
            passenger_email = self.psg_email.entry.get()
            is_email_id_entered = True

        if self.psg_name.entry.get() == "" or self.psg_name.entry.get() == " ":
            var += "Name Should not be empty, "
        else:
            passenger_name = self.psg_name.entry.get()
            is_name_entered = True

        if self.psg_contact.entry.get() == "" or self.psg_contact.entry.get() == " ":
            var += "Contact Should not be empty, "
        else:
            passenger_contact = self.psg_contact.entry.get()
            is_contact_number_entered = True

        print(passenger_email, passenger_contact, passenger_name)

        if is_name_entered and is_email_id_entered and is_contact_number_entered:
            conn = Util.connect_db()
            cursor = conn.cursor()

            key = "PASSENGER_LAST_COUNT"

            cursor.execute('SELECT value FROM system_setting WHERE key IS ?', (key,))
            rows = cursor.fetchone()
            print(rows[0])

            id_count = Util.convert_string_to_int(rows[0]) + 1

            passenger_id = get_passenger_id(id_count) + str(id_count)

            cursor.execute(
                'INSERT INTO passenger_detail(passenger_id, passenger_name, contact_number, email_id) VALUES(?,?,?,?)',
                (passenger_id, passenger_name, passenger_contact, passenger_email))

            conn.commit()

            messagebox.showinfo("Success", "Passenger has been added successfully")
            self.psg_email.entry.delete(0, 'end')
            self.psg_contact.entry.delete(0, 'end')
            self.psg_name.entry.delete(0, 'end')

            self.psg_name.entry.focus()

            cursor.execute("UPDATE system_setting SET value = ? WHERE key = ?",
                           (id_count, key,))
            conn.commit()

            cursor.execute('SELECT * FROM passenger_detail')
            self.sql_output = cursor.fetchall()
            self.tree.delete(*self.tree.get_children())
            for data in self.sql_output:
                self.tree.insert('', 'end', values=data)

        else:
            print(var)
            messagebox.showerror("showerror", var)


    def get_passenger_id(s_id):
        passenger_id = "P"
        count = 0

        if s_id == 0:
            count = 1

        while s_id > 0:
            count = count + 1
            s_id = s_id // 10

        count = 3 - count

        while count > 0:
            passenger_id = passenger_id + "0"
            count = count - 1

        return passenger_id
    def update_table_data(self):
        conn = Util.connect_db()
        cursor = conn.cursor()
        cursor.execute('SELECT * FROM passenger_detail')
        self.sql_output = cursor.fetchall()

        count = 0
        for data in self.sql_output:
            if count % 2 == 0:
                self.tree.insert('', 'end', values=data, tags=('even',))
            else:
                self.tree.insert('', 'end', values=data, tags=('odd',))
            count = count + 1
To edit and delete Product on click on table row, we need to show Edit And Delete Button.
    def on_tree_click(self, *args):
        self.show_edit_button()
        self.show_delete_button()

    def show_edit_button(self, *args):
        self.edit_button = RoundedButton(self.base_frame, 110, 130 / 3.75, self.color, "images/button3.png",
                                         "EDIT",
                                         font=("Lucida Grande", AppConstant.FONT_SIZE - 4),
                                         command=lambda: self.edit_passenger(self.height, self.color))
        self.edit_button.place(x=self.width / 2 + 240, y=self.height * 0.20)


    def show_delete_button(self, *args):
        self.delete_button = RoundedButton(self.base_frame, 110, 130 / 3.75, self.color, "images/button3.png",
                                           "DELETE",
                                           font=("Lucida Grande", AppConstant.FONT_SIZE - 4),
                                           command=self.delete_passenger)
        self.delete_button.place(x=self.width / 2 + 420, y=self.height * 0.20)
    def edit_passenger(self, height, color):

        cur_item = self.tree.focus()

        self.psg_name.entry.delete(0, END)
        self.psg_contact.entry.delete(0, END)
        self.psg_email.entry.delete(0, END)

        self.psg_name.entry.insert(0, self.tree.item(cur_item)["values"][1])
        self.psg_contact.entry.insert(0, self.tree.item(cur_item)["values"][2])
        self.psg_email.entry.insert(0, self.tree.item(cur_item)["values"][3])

        self.add_button.place_forget()

        passenger_id = self.tree.item(cur_item)["values"][0]

        self.hide_edit_button()

        self.update_button = RoundedButton(self.base_frame, 170, 130 / 2.56, color, "images/button3.png", "UPDATE",
                                           font=("Lucida Grande", AppConstant.FONT_SIZE - 2),
                                           command=lambda: self.update_passenger_click(passenger_id))
        self.update_button.place(x=25, y=height * 0.70)

        self.cancel_button = RoundedButton(self.base_frame, 170, 130 / 2.56, color, "images/button3.png", "CANCEL",
                                           font=("Lucida Grande", AppConstant.FONT_SIZE - 2),
                                           command=self.cancel_button_click)
        self.cancel_button.place(x=220, y=height * 0.70)

    def hide_edit_button(self):
         self.edit_button.place_forget()
Implement Update And Cancel Button functionality
    def update_passenger_click(self, passenger_id):
        var = ""
        passenger_email = ""
        passenger_name = ""
        passenger_contact = ""
        is_name_entered = False
        is_contact_number_entered = False
        is_email_id_entered = False

        if self.psg_email.entry.get() == "" or self.psg_email.entry.get() == " ":
            var += "Email Should not be empty, "
        else:
            passenger_email = self.psg_email.entry.get()
            is_email_id_entered = True

        if self.psg_name.entry.get() == "" or self.psg_name.entry.get() == " ":
            var += "Name Should not be empty, "
        else:
            passenger_name = self.psg_name.entry.get()
            is_name_entered = True

        if self.psg_contact.entry.get() == "" or self.psg_contact.entry.get() == " ":
            var += "Contact Should not be empty, "
        else:
            passenger_contact = self.psg_contact.entry.get()
            is_contact_number_entered = True

        print(passenger_email, passenger_contact, passenger_name)

        if is_name_entered and is_email_id_entered and is_contact_number_entered:
            conn = Util.connect_db()
            cursor = conn.cursor()
            cursor.execute(
                "UPDATE passenger_detail SET passenger_name = ?, contact_number = ?, email_id = ?  WHERE passenger_id = ?",
                (passenger_name, passenger_contact, passenger_email, passenger_id,))
            conn.commit()

            self.psg_email.entry.delete(0, 'end')
            self.psg_contact.entry.delete(0, 'end')
            self.psg_name.entry.delete(0, 'end')

            messagebox.showinfo("Success", "Passenger detail has been updated successfully")

            self.tree.delete(*self.tree.get_children())
            self.update_table_data()

            self.add_button = RoundedButton(self.base_frame, 250, 130 / 2.56, self.color, "images/button3.png",
                                            "ADD PASSENGER",
                                            font=("Lucida Grande", AppConstant.FONT_SIZE - 2),
                                            command=self.add_passenger_click)
            self.add_button.place(x=75, y=self.height * 0.70)

            self.hide_edit_button()
            self.cancel_button.place_forget()
            self.update_button.place_forget()


    def update_table_data(self):
        conn = Util.connect_db()
        cursor = conn.cursor()
        cursor.execute('SELECT * FROM passenger_detail')
        self.sql_output = cursor.fetchall()

        count = 0
        for data in self.sql_output:
            if count % 2 == 0:
                self.tree.insert('', 'end', values=data, tags=('even',))
            else:
                self.tree.insert('', 'end', values=data, tags=('odd',))
            count = count + 1
At last we will manage closing of window
    def on_closing():

        root.destroy()
        args[0].deiconify()

    root.protocol("WM_DELETE_WINDOW", on_closing)
Programmer Mirta is for learning and training. Projects might be simple to improve learning. Projects are constantly reviewed to avoid errors, but we cannot assure full correctness of all content. While using Programmer Mitra, you agree to have read and accepted our terms of use, cookie and privacy policy.
Copyright 2021 by Programmer Mitra. All Rights Reserved.